Uh, oops

The holiday on Monday kind of messed me up.

I walked around all day yesterday thinking it was Monday.

My obliviousness continued as I was sitting poolside with the kids, sunning, and congratulating myself on having such a fine, carefree life.

At about three-thirty, I glanced at the calendar on my phone and realized my mistake. A mere half hour before Hannah had a mandatory rehearsal for her dance recital. And an hour before Chase had track practice. And an hour and a half before McKay had baseball.

Needless to say, there was a little bit of cursing.

And a lot of scrambling.

Thankfully, we made it to all three, in large part due to some awesome friends who had left messages offering to carpool. Mindy and Beckie, I owe you one. You girls are the best, and you totally saved my hide.

It was a crazy few hours yesterday.

And so I offer my apologies to you How-To Tuesday devotees. Those of you who put your posts up, patiently waiting for me, the blog host who never showed up to her own party.

I'll try to get my act together a little better next time.

Share with us your wisdom anyway, won't you?

Mister Linky's Magical Widgets -- Easy-Linky widget will appear right here!
This preview will disappear when the widget is displayed on your site.
For best results, use HTML mode to edit this section of the post.

How-To Tuesday: How to clean your microwave


Photobucket
image via

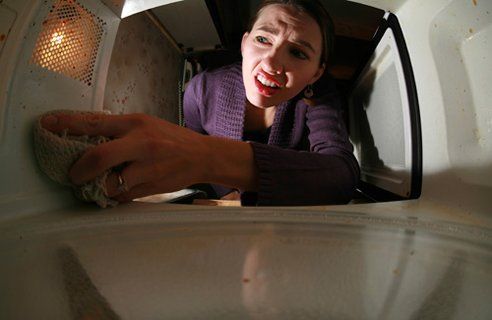
Today's post comes to you courtesy of my children and their inability to cover things when heating them up in the microwave.

You know that popping sound you hear when heating up leftover pizza? It seriously sends terror and chills down my spine.

Sort of like that scene in Sleeping With the Enemy when Julia Roberts' character hears the Symphonie Fantastique and just knows that she has been found by her brute of a husband and is about to be killed.

Yeah. Cheese exploding in the microwave does the same thing to me.

And since I figured out a solution that was better than death to the children, I will share it with you here. So that your children may also live to see another day.

Step one: Microwave some water in a cup for 3-4 minutes. More if your microwave is like mine especially disgusting.

Step two: Let it sit without opening the microwave door for 2-3 minutes. Choosing to spend this time lecturing your children on the importance of paper towels over plates they heat up might be a good idea.

Step three: Open the microwave, and wipe it down. You'll find the melted food comes right off.

Step four: Lecture the children one more time in the vain hope that this time it will sink in. Then find a strange desire to re-watch Sleeping With the Enemy.

Your turn. What you got this week?

Mister Linky's Magical Widgets -- Easy-Linky widget will appear right here!
This preview will disappear when the widget is displayed on your site.
For best results, use HTML mode to edit this section of the post.
How-To Tuesday: How to fail utterly at your own blog carnival

Step one: Be swamped every second of the day on Monday until the moment you collapse into bed late at night.

Step two: Sit bolt upright in bed on Monday night and realize you did not do a how-to Tuesday post.

Step three: Collapse back onto your soft pillows and decide that it's okay.

Step four: Fall fast asleep.

Step five: Apologize, beg the internet's mercy, and plan a really great post for next week.

Forgive me, will you? [And still feel free to share your brilliance here.]

I know. I am so lame it's ridiculous.

Mister Linky's Magical Widgets -- Easy-Linky widget will appear right here!
This preview will disappear when the widget is displayed on your site.
For best results, use HTML mode to edit this section of the post.
How-To Tuesday: How to make homemade pitas


Today's How-To post comes to you in one of my all-time favorite forms: The Carbohydrate.

Making your own pitas are so simple, you will never buy the cardboard tasting ones at the store ever again. Seriously. Stop buying that crap. They're gross and full of all kinds of preservatives. Spend a half hour or so making these and thank me later.

[I accept all forms of thanks, including, but not limited to: diet coke, cookies, and/or cash.]

Photobucket

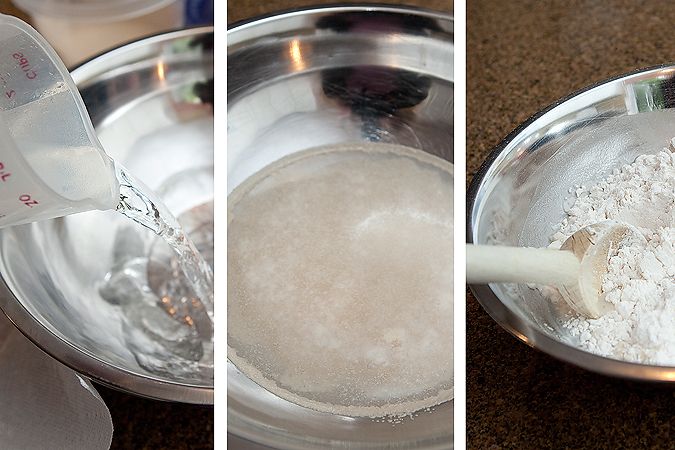
Here's what you do: Take 1 1/4 cup warm water and add 2 1/2 tsp. yeast. Let it sit for about 10 minutes until the yeast is bubbled up.

Then add: 3 cups flour, 1/2 tsp. salt, 1 tsp. sugar, and 1 Tbsp. oil. Mix well.

Photobucket

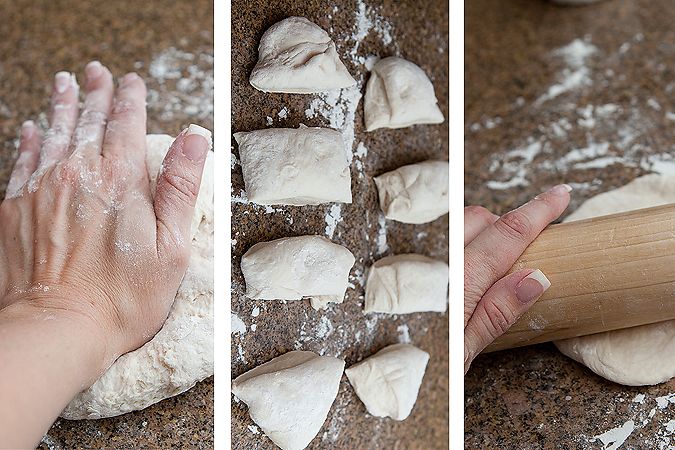
Turn the dough onto the counter and knead well, adding flour as necessary. Divide the dough into eight equal parts. Roll each part into a ball, then flatten into a six-inch circle with your rolling pin.

Photobucket

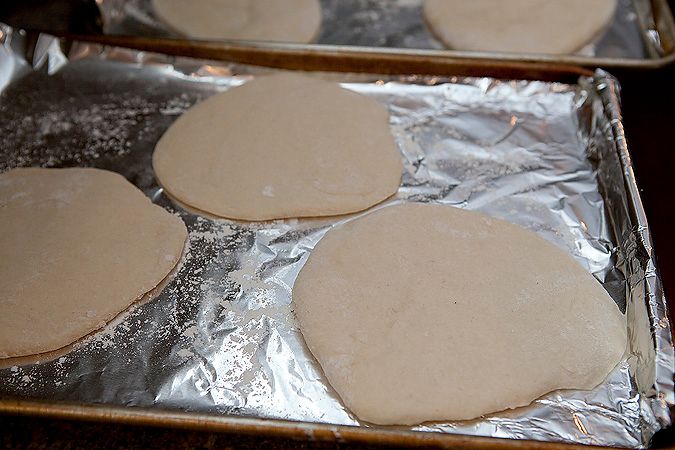
Put circles on heavily-floured foil or parchment paper. Let rest for 30-45 minutes, until dough starts to slightly rise.

Photobucket

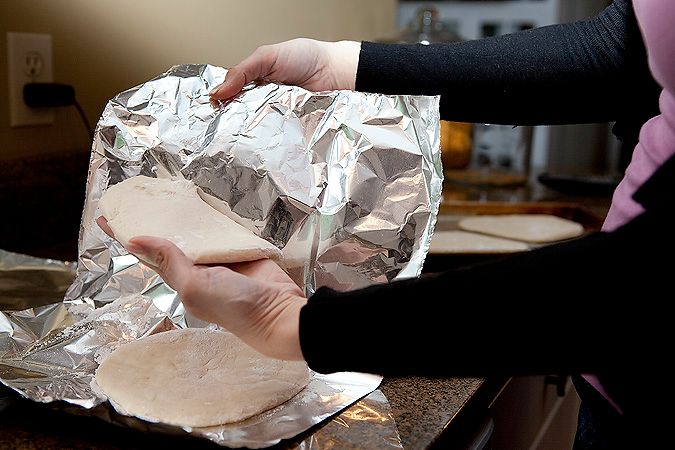
Then gently peel off each pita and place onto an ungreased baking sheet. You need to do this step; otherwise, they will stick to your pan as they rise in the oven.

Photobucket

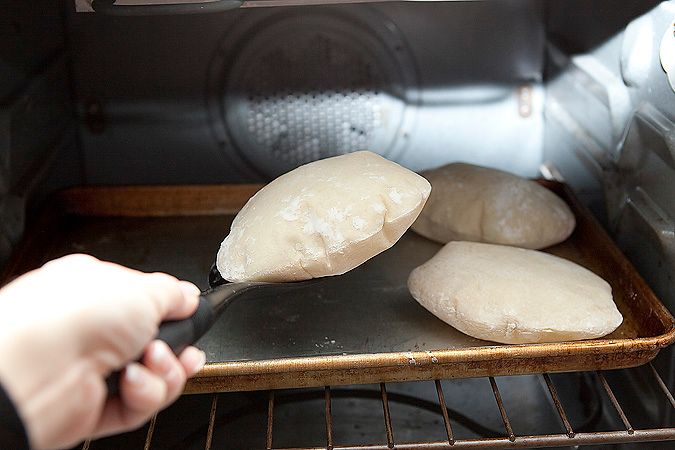
Bake in a pre-heated 500 degree oven for about 3 minutes per side, turning halfway through. The pitas will puff up while baking. This gives you the hollow center for filling with deliciousness later.

Photobucket

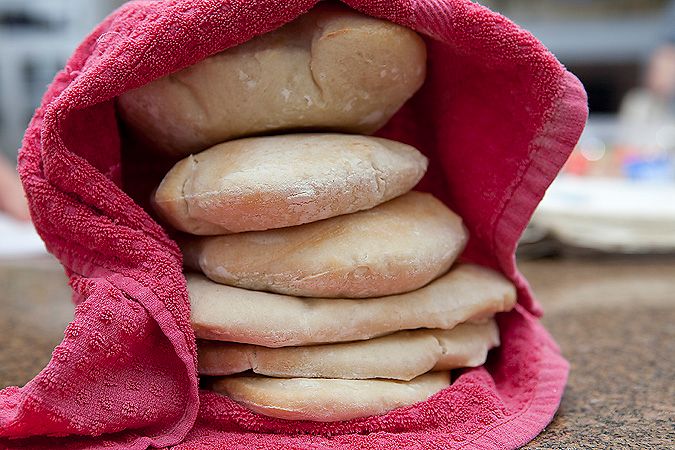
Remove from the oven and stack pitas on top of each other, gently covering them with a towel. Let the pitas rest, and as the steam gradually escapes, each pita flattens out.

Photobucket

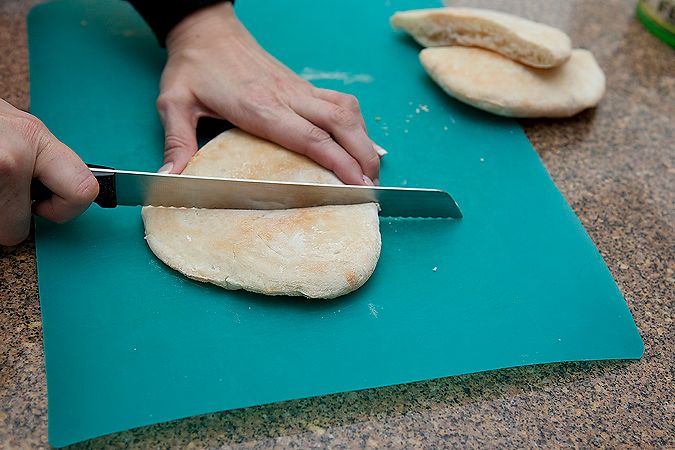
Slice in half with a serrated knife.

Photobucket

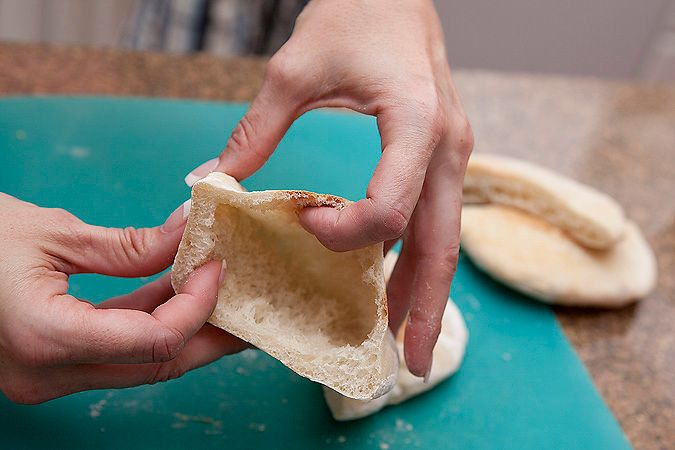
And, voila! A lovely little pocket just waiting to be filled with good things.

Photobucket

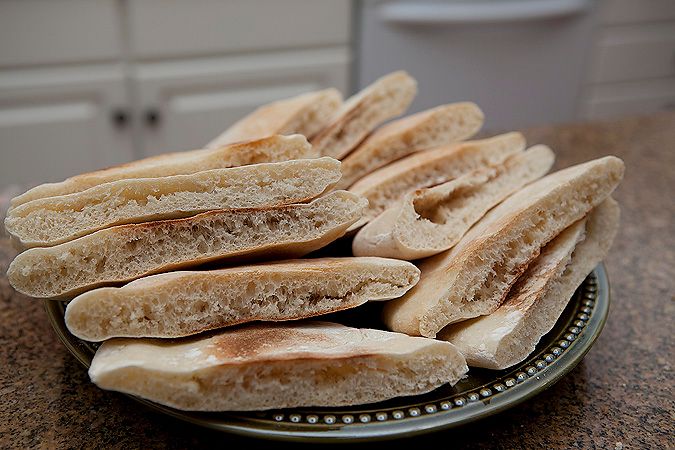
These are fantastic right out of the oven, can be made hours ahead, and even freeze well. Look at all the lovelies just waiting to be consumed:

Photobucket

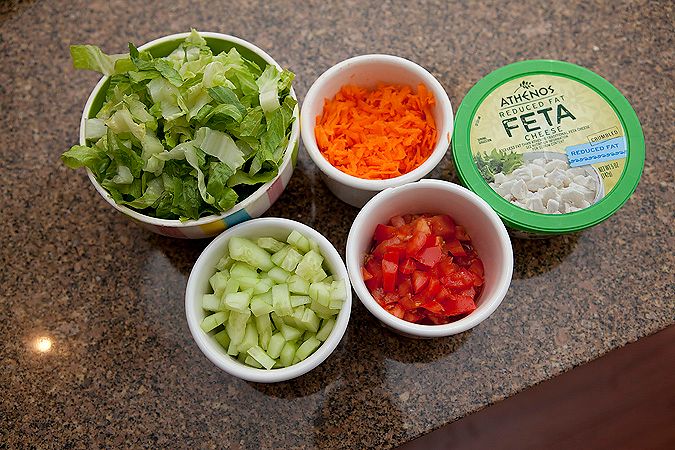
Here are some of our fillings of choice.

[Not pictured: some chicken breast that I sauteed in a little bit of Italian dressing. Drizzle a little dressing onto your filled pita and you have a feast. (Though I am thinking Linsey's homemade hummus would be delish with these bad boys. Note to self: Get to the store ahead of time).]

Photobucket

And for a more printable version:

Pita pockets
1 pkg. yeast
1 1/4 cup warm water
3 cup flour
1/2 tsp salt
1 tsp. sugar
1 Tbsp. oil

Sprinkle yeast over water in large bowl. Let sit for 10 minutes or until yeast is bubbly. Add flour, sugar, salt, and oil. Mix well. Knead dough until soft; divide into 8 equal parts. Roll each part into a ball and flatten into a six-inch circle with a rolling pin. Let rest on floured tin foil for 30-45 minutes or until slightly puffy. Peel off foil and put onto ungreased cookie sheets. Bake at 500 for 4-8 min. flipping halfway through. Stack on top of each other and cover loosely with dish towel to let steam escape. Slice in half and enjoy with your favorite salad or toppings.


And that's it. Your turn.

Teach me. Teach me now, dammit.

Mister Linky's Magical Widgets -- Easy-Linky widget will appear right here!
This preview will disappear when the widget is displayed on your site.
For best results, use HTML mode to edit this section of the post.
How-To Tuesday: How to whiten teeth in photoshop


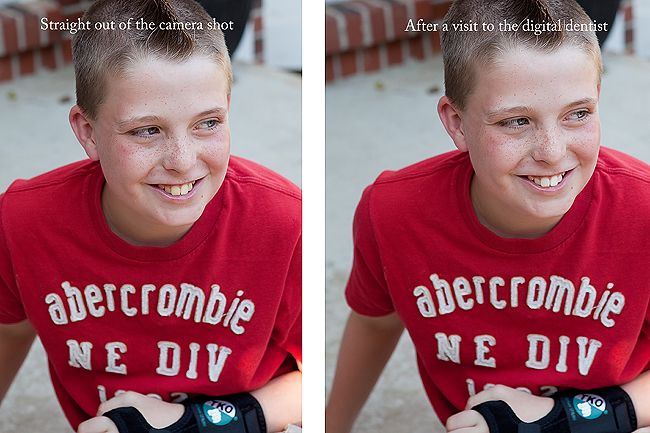
Let's say you have a photo of your son that you love. Your son and his awesome mohawk from last year. Only, since he is a kid, and not always as diligent as you'd like him to be, his teeth brushing has left something to be desired. Rather than live with the yellow not-quite-white teeth in the photo, I am going to show you how to fix it.

Photobucket

There about 9,459 ways in Photoshop to whiten teeth. I make no claim that this is THE one and only way. It's just the way I do it. And it takes less than a minute.

Step one: Open your image in Photoshop. I use CS3, but I believe it would work in Elements, as well as the newer versions.

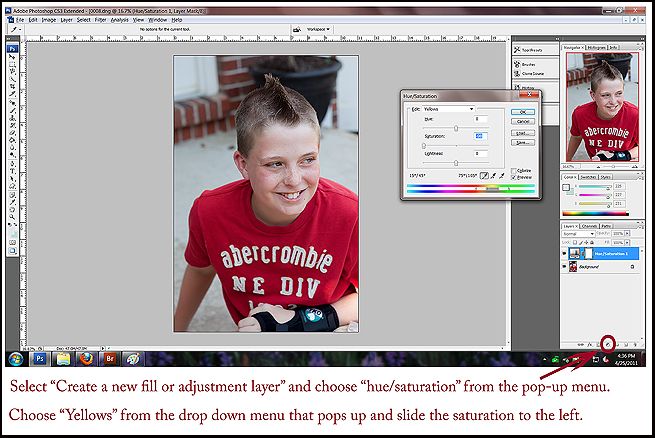
Select the yin/yang looking icon on the bottom right hand side to create a new adjustment layer. In the pop-up menu, select "Hue/Saturation."

When the Hue/Saturation dialogue box pops up, select "Yellow" from the pop-down menu, and turn the slider for saturation to the left until your teeth have no yellow in them. At this point, you will likely have ruined the rest of the photo, but take heart, we will fix it later. Just focus on the teeth. Click OK.

Photobucket

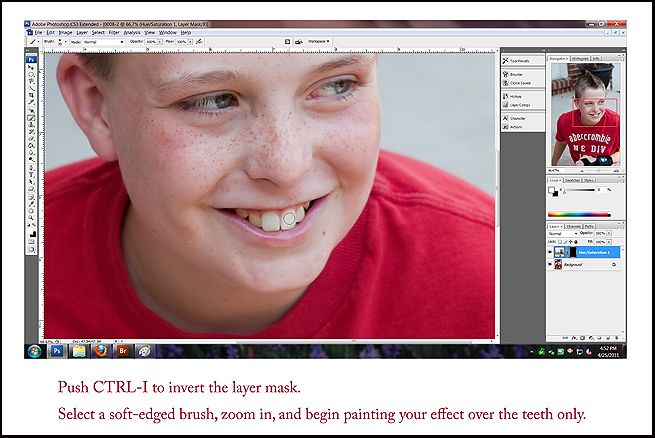
Zoom in until your screen is filled mostly with the teeth. Now you want to hit CTRL-I, which will invert the layer mask. We will then use our brush tool (just push letter B and it will shortcut to the brush). Choose a soft-edged brush and begin "painting" over the teeth. This paints our saturation adjustment layer back in - restoring the fix we did, but only in the areas we want (i.e., the teeth). If all looks okay to you, merge down your layers.

Photobucket

Still with me?

Good. You can do this. While the teeth look considerably less yellow, they lack any whiteness or brightness to them. We want to fix that.

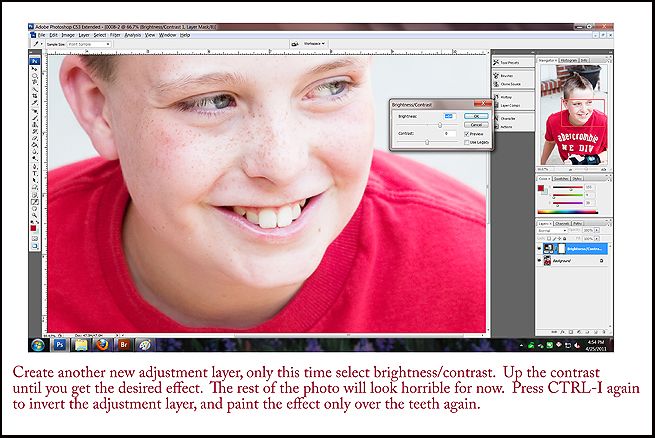
Create another adjustment layer, this time click on "Brightness/Contrast" from the pop-up menu. In the dialogue box, you want to take your brightness slider and move it to the right. Don't panic when your whole image starts to look wrong. It's all about the teeth right now. We'll fix the rest later.

Once your teeth look nice and bright, select okay.

Photobucket

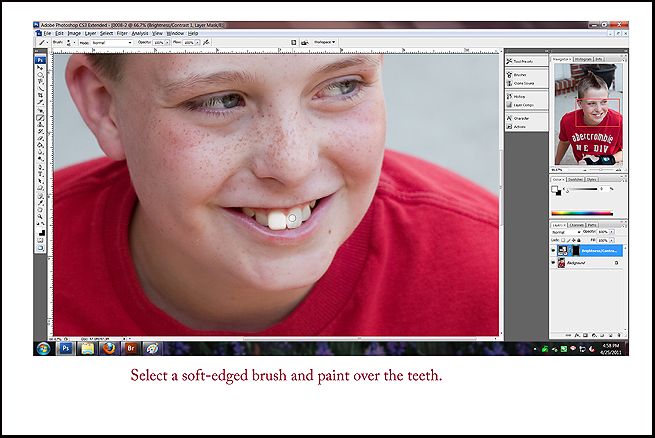
Then hit CTRL-I again to invert the layer. Select your brush tool (B) and paint over the teeth again.

Photobucket

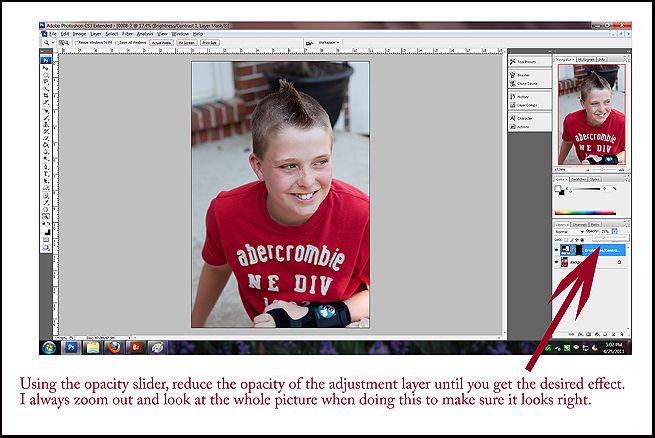
They will likely look horribly white - too white. Zoom out until you are looking at the whole picture. Then take your opacity slider on the brightness/contrast adjustment layer and reduce it until it looks right to you. For me, that number is usually around 25-35 percent. Do what looks best on your photo. Neon white teeth? Not so good. But we want to pop the brightness just a bit. Then merge the layers down.

Photobucket

And that's it! It sounds way more complicated than it actually is. And here is our SOOC (straight out of the camera) shot and the edited version. The difference is subtle, but that means we didn't overdo it in editing. A nice, white smile that doesn't look like we photoshopped the crap out of it.

Always a good thing.

Photobucket

Your turn. What can you teach me today?

Mister Linky's Magical Widgets -- Easy-Linky widget will appear right here!
This preview will disappear when the widget is displayed on your site.
For best results, use HTML mode to edit this section of the post.
How-To Tuesday: Organizational behavior, Stie style


Before I got married, I made all sorts of promises to the Husband. Promises that the now me rolls on the floor laughing at. Promises that, if made today, the Husband would double over with laughter and say, "I'm sorry, have we met?"

Yes, as a soon-to-be-newlywed, I naively said things like:

I am going to be dressed and ready every day before you leave for work.
I am going to make sure you always have ironed shirts waiting in the closet.
I am going to have a hot meal on the table when you come home every day.
I am going to devote hours of my life to keeping a clean home.

Bwaaahhhaaa, right?

Okay. So maybe I kind of do the last one. But the others? Took me less than two weeks to pretty much abandon the lot of them. Unapologetically, at that.

But one thing I did embrace was my inner OCD, and our home has been (for the most part) neat and organized ever since.

Keep in mind, short of laundry days, I probably only spend 30-45 minutes cleaning each day. Believe me, there are bigger fish to fry in my life. But with a little bit of planning and organization, you can stay on top of your work and enjoy a clean house, too. Here's how:

Number one: I do laundry twice a week, and only twice a week: Mondays and Thursdays. Laundry must be finished to completion. No loads are allowed to be left undone for the next day. Otherwise, you'll NEVER get caught up. Stay on top of it and fold each load as soon as the dryer is done.

Lucky for me, my dryer finishes a load about 12-13 minutes before the washer is done washing. (I know. It's awesome). I grab the dry load and have it folded before the wash cycle is done. Then it's a quick switch and I'm off to read blogs the next task on my list.

Number two: I clean two bathrooms on Tuesdays and two bathrooms on Fridays (we currently have four of them, so it means they get a thorough scrubbing once a week). I loathe cleaning the bathrooms, but it is a necessary evil. I have two boys whose aim defies the laws of physics. It is not pretty in there. But until I can convince the Husband to pay someone else to do it, the dirty job has got to be done.

Number three: I pick a problem area (be it closet, drawer, cupboard, desk or occasionally even a child's room) and clean it on Wednesdays. When I have more time, I tackle the bigger projects. But sometimes just cleaning out a drawer or cupboard in the kitchen makes all the difference for my sanity, and it takes very little time. I feel like I've accomplished something and it motivates me to keep going.

Number four: Multi-task. Key to this is speed and constancy. Don't let any one area get out of hand. Hurry and throw those breakfast dishes in the dishwasher right after breakfast. Dust while you're on a phone call. Sweep/vacuum quickly while the kids are doing homework. Wipe down a glass door while dinner is cooking. We are all busy. We all have no time. But ten minutes here or there can make a huge difference. You'll be surprised how much you can get done in a short amount of time.

Number five: Be organized. Everything has a place, and every member of the family must know where that place is. If you find you are constantly clearing the mail pile off the kitchen counter, then you need a designated spot for it. Get a cute basket or mail sorter and find a home for the wayward bills. If your kids are constantly leaving their shoes in a pile by the door, get a shoe cubby. It takes time to train your family to be organized, but I am living proof that it can be done. If there is a mess in the same place all the time, then it means you don't have a place for that mess. Find a place, train your people, and sit back and watch your house clean itself.

Well, almost.

Your turn. What have you got for us today?

P.S. A reader sent me a great suggestion: Leave what you're teaching in the linky rather than your name. Makes it easy to go back and search for a particular link without having to dig through piles and piles of posts, you know?

Mister Linky's Magical Widgets -- Easy-Linky widget will appear right here!
This preview will disappear when the widget is displayed on your site.
For best results, use HTML mode to edit this section of the post.